Friday, September 22, 2006

Waiting For Success

There is an interesting discussion going on over at the CafePress forums.

Someone said that newbies should be patient and give a design/shop three months before they consider it a failure. Someone else said that this was bad advice and that one should wait at least a year before calling a shop/design a failure. The second person even said that one should not listen to advice given by people who have been in the CafePress business for less than two years.

The thing about two years of experience before you qualify for giving advice is a complete nonsense. There are people who may have no experience in being a CafePress shopkeeper but on the other hand have huge knowledge about SEO or marketing. Why wouldn't they give advice? I believe that everyone can bring something new and everyone should be listened to. Not every advice needs to be taken, but for myself I will listen/read everything and use whatever I find interesting be it from a CafePress veteran or not.

Patience, yes, that's true. Patience is a must and I will repeat that a million times. Patience, patience, patience.

Having said that, I have to say that waiting is not easy. As a relatively new shopkeeper I know how hard it is to put in 12 hours of work a day and get just two or three sales a month if that many. It's easy to say be patient when you are getting 20 sales a day. Some of the people in that thread say... oh yes, be patient, wait for months and months... but in another thread they come and complain when they sell only two or three things a day. I'd like to see their morals if they would suddenly have to wait three months (or a year!) to get a sale. Would they say, oh cool, never mind the sales I'll just keep working on it in the next 12 months or would they start having doubts and thinking of quitting?

My final words... yes, I'll be patient and keep working on it, but yes I will be disappointed and long for more sales and better results at times. Up and down... riding on the waves... that's how life is for me.

Tuesday, September 19, 2006

Reading Material

Today I discovered the chats & workshops page on the CafePress site. I should have known about it for ages, probably, but I did not. Better late than never, right?

There is a lot to read there, I can't possibly read everything at once. I read transcripts from a few chats that had subjects that I thought would be of most use for me at this stage of my shopkeeper life.

I had to weed through the logs a bit, but in general there is a lot of good advice and info there. Most of the things we all already know. Write good tags, do a good work on SEO, make your store shopper friendly... Still, it is a good read and there is no harm in reminding myself of the important and useful stuff.

Thursday, September 14, 2006

Warning - Editing Multiple Stores

I just read a post over at the CafePress forums where someone had unintentionally changed the look of a whole premium store.

The same thing happened to me a month or so ago. I only have one account and only basic shops, unlike the person who posted, but the situation was basically the same.

Here is what happened to me. I had one window open writing the front page description of a shop. I wanted to see what description I used in another shop and opened the manager for that other shop in another window. I went to the manager of the other shop, opened the window with the front page description and read what I had written there. Without closing the window of the second shop I went back to the first shop, finished writing the description and saved the information. The next time I checked the second shop had exactly the same description as the first shop, even though I never edited or saved anything new in that second shop.

You see, what happens is that if you have two windows open with shop manager edit pages of two different stores in each, when you save information in one shop it will automatically be saved in the other one, too.

I only had to rewrite one description, but I can imagine how much of a mess would it be if the layout or descriptions of a premium shop would be overwritten and gone.

The moral of the story... Only edit one shop at a time and don't even think of opening the manager of a second shop until you finish working on the first shop.

Wednesday, September 13, 2006

Free Fonts

Do you need free fonts to use when making your designs? I do! I am always on the lookout for a nice free font.

If you ask me, the best place on the web for free fonts is dafont.com. Dafont is a nice designed, well organized website that makes looking for fonts a joy.

Most of the fonts at dafont are free, but not all are free for commercial use. I make sure to read both the info on the website and than the readme file packed with the font before I make sure it is completely free and install the font on my computer.

Even with the exclusion of those that are not free for commercial use there are more than enough great fonts on dafont. When you need nice letters, numbers and dingbats for your designs... dafont is the first place to go to. Great site!

Sunday, September 10, 2006

No Sales - Why?

Every few days a question pops up on CafePress forums.

  • I am not making any sales. What am I doing wrong?

Here are all the possible answers I can think of:

  1. You did not read the help pages. I strongly recommend that every new shopkeeper reads all the help texts and files provided by CafeShop. There is the learning center, there are the tips, templates... Further, s newbie shopkeeper should read CafePress forums archive, especially the stickied threads, and than make it a habit to read the forums on regular bases. There are additional useful texts to read at Cafepedia and it is highly recommended to read those, too. It sounds like a lot of reading, but if you want to make sales there is no other choice but to learn everything there is to know. Most of the other shopkeepers are willing to help with specific problems, but nobody will hold your hand and guide you through everything.
  2. You think that CafePress is easy money. Being a shopkeeper is a complex and demanding job. You need to know at least the basics of design, marketing, copywriting and SEO plus be witty, artistic or both. Making a quick design and putting it on a few products in a basic shop and than waiting for sales will not do.
  3. You forgot to write tags when you uploaded your images. Tags make your designs visible in the marketplace. It will take time for search engines to index your shop and for affiliates to notice you, so the marketplace is your best bet. You do not want to exclude your best bet, so check your tags.
  4. Your used generic tags. Dog is a descriptive tag, but how many designs are there that are tagged with the dog? Too many! Miniature dachshund is a much better, more specific tag. Another example... gifts doesn't say much while dog lover gifts is a much better, well targeted tag.
  5. You do not do any marketing. You need to promote your products every way possible. Squidoo, Craigslist, MySpace, AdWords, Froogle are just a few. Collectively they make a powerful tool for making your products visible to shoppers.
  6. You offer just a few designs on a few products. Make a variety of products and put each on all the products where it fits and makes sense. The more designs the better chance that somebody will like one of them. The more products the better chance that the person that likes the design will find it on a products s/he wants to buy. Someone might like your design, but what if s/he wants it on a sticker and you only offer t shirts?
  7. Your designs don't fit the products. Products with unfitting designs look unprofessional and unattractive. Put some effort into making your designs. Make a clock design, a mug design, re-size your designs to fit different products. CafePress is full of talented people working hard on making best possible designs. If you want to compete with them, you will have to work hard on your own designs.
  8. You did not take the time to write quality descriptions. Your products, sections, shop front, titles and meta tags will all have to be filled with descriptions filled with relevant keywords. As soon as your shop gets listed by the search engines the descriptions will play a huge role in your visibility to the shoppers. It takes time to write the descriptions, but once again, you just have to do it if you want sales.
  9. You were not lucky enough to get a sale. Yes, luck plays its role on CafePress, too. It is the matter of the right person looking at the right designs at the right time. If you do everything from the previous eight points you will not need a lot of luck to make sales. If not, you'll need lots and lots of luck.
  10. Finally, the reason why you have made no sales might be that you have not been a shopkeeper for long enough. Many shopkeepers wait months for their first sale. They say that if you make a few sales in the first couple of months than you are doing extremely well. You would need an existing audience to start making a lot of sales right away. If you are starting from scratch you will need to wait before your sales start piling up.

Perseverance, hard work, continuous learning and patience are a must for a CafePress shopkeeper. Keep working at it and the sales will come!

Friday, September 08, 2006

Making Images With Transparent Background Using GIMP - Illustrated Tutorial

It took me a while to learn how to make images with transparent backgrounds to use on black shirts (dark shirts as of lately). Knowing how frustrating it can be, I decided to be helpful and make an illustrated tutorial for newbies. I give you a step by step guide to making transparent images using the free graphics program GIMP.
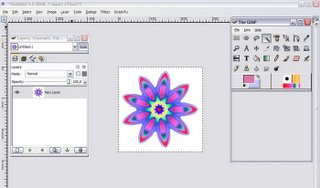
First open the file with your image. I used a simple image of a flower made for this tutorial exclusively. Since it is not going to be used as a real design, it has a small pixel size. Normally, with a design you would have an image of a much bigger size.

The picture shows the layers window, the image and the GIMP window. There is just one layer present, the one with the image.
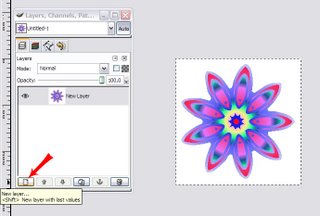
Create a new layer by pressing the button in the bottom row of the layers window. Just follow the red arrow.

To view a bigger picture of the image on the left just click on it.
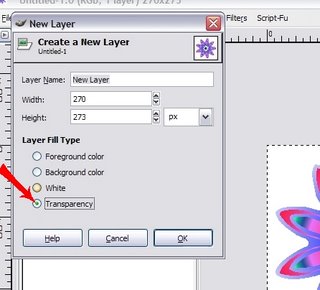
A new window will open to give you different options related to the new layer.

In the new layer window, be sure to pick the transparency option. The width and height will be automatically set to match the image size.
Now you have two layers. The transparent layer is highlighted which means it is active. We need to work with the image, so we click on the white space around the old layer, the one with the image.
If everything was done right, the layer with the image is highlighted. We can go on with the job now.
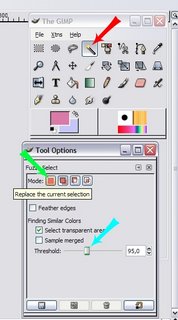
In the GIMP window double click the magic wand icon marked with the red arrow.

A new window will open called Tool Options. If your image has just one connected surface that you want to make transparent (like the one in the example) than make sure to select the first option in the list of mode options (see green arrow).

The blue arrow shows the threshold slider. If your background is made of a solid color, than you can put the threshold to zero, but if it has slight variations of color you might need to move the threshold to a bigger number.

Trial and error method will help you select the right threshold. Pick the threshold, click the background if the right surface was picked you did it, if not, change the threshold and try again. Repeat until you get what you want.


If you have two or more separate surfaces that you want to make transparent pick the second mode option - the one indicated by the arrow.

Find the right threshold value by doing the same as described above.

After you find the threshold click on all surfaces that you want to make transparent.


This picture shows the image with a correctly selected background. Everything that is not part of the design is selected.
Right click the image. Go to select and than click on invert.

Now, the whole design is selected and the background is left out.
Right click the image again. Go to edit and than click on copy.
Go to the layers window and click on the eye icon of the image layer like indicated by the arrow.

We do this to avoid the confusion when viewing the image.
Select the transparent layer. It has to be highlighted on the list of layers.
Right click the image. Select edit and than click on paste into.
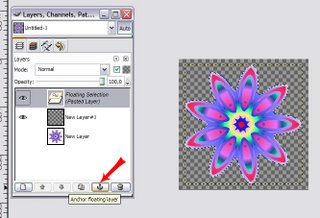

Click on the anchor icon on the bottom of the layers window.
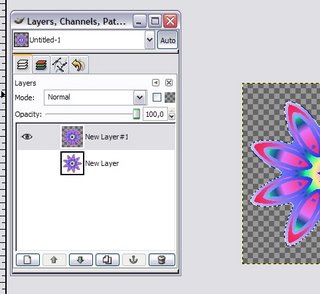
Now we have two layers. Each layer has your design in it, but one has a transparent background and the other has a colored background.
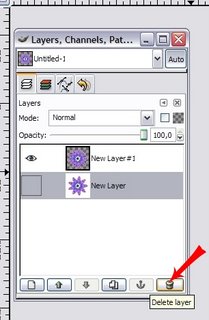
Highlight the layer with the colored background. Make sure that the layer with the transparent background is not highlighted.

Click on the delete layer icon.
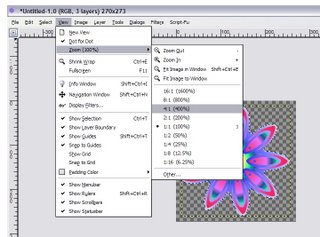
Go to view menu, select zoom and than pick a zoom that will make your design a couple of times bigger than its real size.
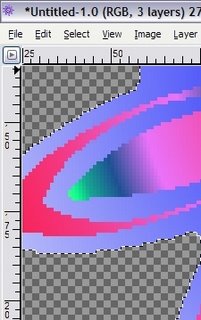
Look at the edges of your design. I did not use anti-alias and the edge to the image is sharp which is what we want when making designs for dark surfaces.

If you used anti-alias you might have a thin whit/gray border around your image. In that case you will have to go to selection menu, choose shrink and than shrink your selection by two or three pixels. When you do that copy the selection and go back to the create a new transparent layer and paste the selection into it and than delete the layer with the white border around the edges.
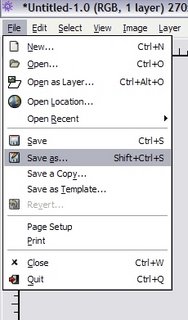
When you make sure that your border is fine and that you have just one layer with the transparent you can go on and save the image.
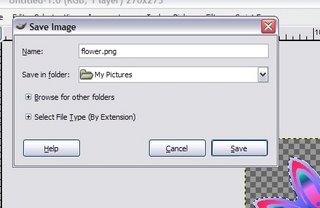
Choose a name for your image, the folder and make it be a PNG file type.
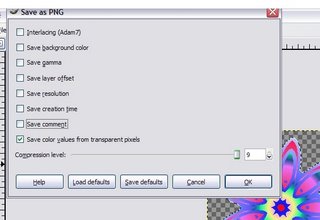

Be sure to leave the save color values from transparent pixels checked. I turn off all the other options, but you could choose to leave the comment or date.

Click OK and you are done. Your images is ready to be uploaded to CafePress. If you have done everything right, after you upload the image CafePress will show a transparency picker bellow the image allowing you to pick white or black transparency. The presence of the picker is a sure sign that your image is transparent.